
Menu


Get Sales Advice from Mon - Fri 9am - 5:00pm:
020 3337 8950LAST UPDATED: March 10, 2026
Mac Screenshot Guide: Easy Ways to Capture Your Screen in 2026
Whether you're showing a colleague an error message, sharing a high score from your favourite game, or creating a tutorial, screenshots are one of the handiest tools on any computer. On Mac computers, Apple has made the process slick, versatile, and surprisingly powerful, especially with the latest updates in 2026.
By the end of this guide, you'll not only know how to screenshot on a MacBook step by step, but also how to edit, organise, and share your captures like a pro.
Plus, if you're considering an upgrade, we'll highlight the latest Mac laptops available, from the ultra-portable MacBook Air to the powerhouse MacBook Pro so you can find the right device to fit your workflow.
So, let's dive in and discover all the smart ways to capture your screen on a Mac in 2026.
How to Screenshot on MacBook?
Apple has made screenshots simple with a handful of intuitive keyboard shortcuts. Unlike Windows, where "Print Screen" captures the entire display, macOS gives you the freedom to choose exactly what you want.
- Shift + Command + 3: Capture the entire screen instantly.
- Shift + Command + 4: Select a custom portion of the screen with a drag box.
- Shift + Command + 5: Open the Screenshot Utility for advanced options, including video recording.
- Shift + Command + 6: (For Touch Bar models) Capture what's displayed on your Touch Bar.
By default, screenshots save to your desktop with a timestamp-based name. The default file format is PNG, which offers excellent quality. If you prefer smaller file sizes, you can change the format to JPEG or PDF.
These shortcuts work across almost every Apple MacBook, from older models right up to the latest Mac laptops.
Capture Full Screen on Mac
The simplest way to grab everything on your display is with Shift + Command + 3. This captures every pixel of your screen, including your menu bar, Dock, and any open windows.
This is ideal if you:
- Need to show your Mac desktop layout in full.
- Capture multiple apps at once.
- Save gaming sessions or livestream screens.
| Pro tip: If you want to copy your screenshot straight to your clipboard, press Control + Shift + Command + 3. This way, you can paste it directly into an app like Notes, Mail, or even a chat without creating extra files. |
Capturing a Selected Portion of the Screen
Sometimes you don't need the whole screen; just a slice of it. That's where Shift + Command + 4 comes in.
When pressed, your cursor changes to a crosshair. Simply drag to select the area you want to capture. You can adjust the box before releasing the mouse or trackpad.
This is perfect for:
- Highlighting a section of a webpage.
- Capturing part of a document for study notes.
- Grabbing a toolbar or settings menu without distractions.
Again, pressing Control with the shortcut sends it straight to your clipboard instead of saving a file.
Screenshots of a Single Window or Menu
For crisp, professional-looking grabs, use Shift + Command + 4 + Spacebar. This changes your cursor to a camera icon. Hover over any window (Safari, Finder, or even the Dock) and click to capture it.
By default, macOS adds a subtle drop shadow for a polished effect. If you'd prefer a cleaner look, hold down Option while clicking to remove the shadow.
This method is excellent for:
- Creating clean app tutorials.
- Reporting bugs to developers.
- Keeping notes with individual app windows.
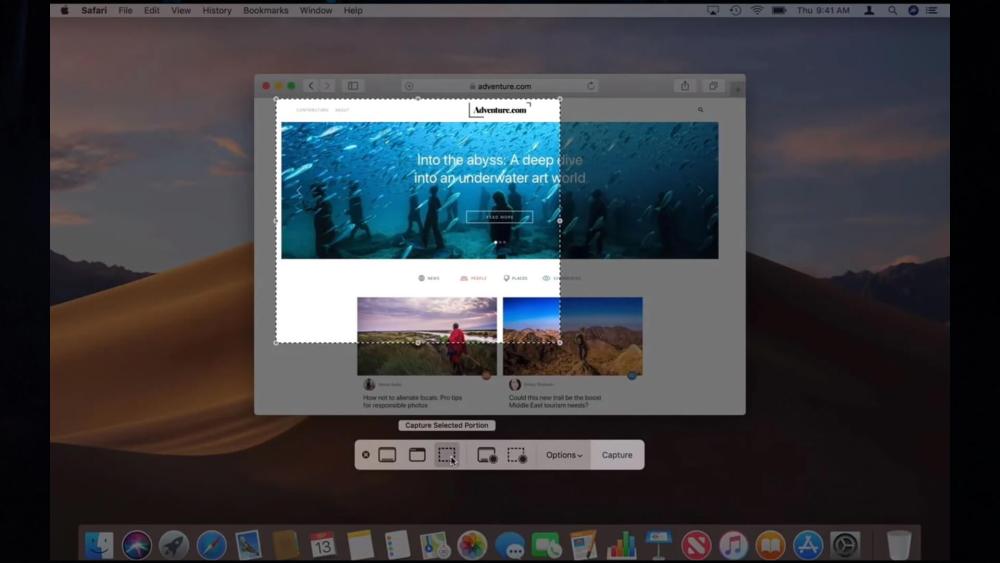
Using the Screenshot Utility (Shift + Command + 5)
Pressing Shift + Command + 5 opens the powerful Screenshot Utility toolbar at the bottom of your screen. From here, you can:
- Capture the full screen.
- Grab a selected window.
- Capture a custom area.
- Record the entire screen or a portion of it.
It also includes settings for:
- Choosing where files save.
- Adding a timer before capture.
- Including audio input for screen recordings.
- Selecting file format preferences.
Think of this as the control centre for screenshots on macOS, making it easy to adjust how and where you capture content.
Recording Your Screen on Mac

Screenshots are handy, but sometimes only a video will do. Using the Screenshot Utility or QuickTime Player, you can record your entire display or just a portion of it.
QuickTime Player also lets you add voice narration; great for walkthroughs, online lessons, or sharing gameplay.
| Just remember: screen recordings can eat up space quickly, especially on a MacBook Air with smaller storage. Consider saving recordings to an external drive or cloud storage if you're creating long videos. |
Editing and Annotating Screenshots
Every time you take a screenshot on a Mac, a small thumbnail preview appears in the corner of your screen. Clicking it opens the built-in Markup tools, which let you draw arrows or shapes, highlight text, add captions, crop sections, or resize the image with ease. If you need more control, you can open the screenshot in the Preview app, where you'll find extra options such as adding signatures, converting file formats, or adjusting the resolution for different uses.
With these tools built right into macOS, you often won't need third-party apps most quick edits and annotations can be done instantly without leaving your desktop.
Advanced Screenshot Tips & Tricks (2026 Edition)
Once you've mastered the basics, the Mac Screenshot Guide offers a few advanced tricks that can make your screenshot workflow faster and more polished.
- Touch Bar Captures: If you own a MacBook Pro with a Touch Bar, you can capture exactly what's showing there by pressing Shift + Command + 6. This is handy if you want to document app-specific Touch Bar shortcuts or share unique controls with others.
- Change the Default Format: By default, screenshots save as PNG files. These look crisp but can be a bit large in size. With a quick Terminal command, you can change the format to JPEG (smaller files) or PDF (ideal for documents). This is especially useful if you take a lot of screenshots and want to save storage space.
- Automate with the Shortcuts App: Apple's Shortcuts app can automate repetitive tasks. For example, you could create a shortcut that automatically renames screenshots, resizes them, and saves them into a "Work" or "Study" folder. Perfect if you're capturing multiple images for projects or assignments.
- Optimise File Sizes: Sometimes you'll need to email or upload screenshots online. In those cases, compressing your images helps. Tools like Preview (built into macOS) let you export to smaller sizes without noticeably affecting quality.
- Accessibility Features: Not everyone prefers the default hotkeys. macOS allows you to re-map shortcuts or even trigger screenshots with voice commands using Voice Control. This makes the process more inclusive and flexible.
With these advanced options, your screenshots won't just be quick; they'll be efficient, organised, and tailored to your workflow.
What Should You Do If Mac Screenshots Aren't Saving?
Even the most reliable Macs can run into small hiccups, and screenshots not saving is a common one.
First, check Finder > Desktop or the custom folder you've chosen, since files may be hiding there. If nothing shows up, it's worth confirming that your keyboard shortcuts haven't been reassigned in settings.
Storage space can also be the culprit, so make sure your drive isn't full. If the issue is that no thumbnail previews appear, a quick restart usually fixes it. And if all else fails, you can reset screenshot preferences via Terminal or turn to third-party apps as a backup solution until the problem is sorted.
Key Takeaway!
Taking screenshots on a Mac laptop has never been easier. From lightning-fast shortcuts to the powerful Screenshot Utility, Apple gives you all the tools you need to capture, edit, and share your screen effortlessly.
If you're ready to upgrade your device for smoother performance, check out the latest MacBook Air, MacBook Pro, or other Apple laptops at Box.co.uk.
Whether you need a student-friendly affordable MacBook or the power of a new MacBook Pro, Box.co.uk has a full range to suit every budget.
Frequently Asked Questions
How to take a screenshot on Mac?
To take a screenshot on Mac, press Shift + Command + 3 to capture the entire screen. The image will automatically save to your desktop.
What is the Mac screenshot shortcut?
The most common Mac screenshot shortcut is:
- Shift + Command + 3 – Full screen
- Shift + Command + 4 – Select a specific area
- Shift + Command + 5 – Open the full screenshot toolbar
How to screenshot on a MacBook?
To screenshot on a MacBook, use Shift + Command + 4, then drag your cursor to select the area you want to capture. Release the mouse to save the screenshot.
Where is the Print Screen button on Mac?
There is no traditional Print Screen Mac button. Instead, macOS uses keyboard shortcuts like Shift + Command + 3 to perform the same function.
What is the snipping tool on Mac?
Mac doesn't have a tool called "Snipping Tool" like Windows, but Shift + Command + 4 works as the Mac equivalent. You can also press Shift + Command + 5 to access advanced screen capture options.
How do I take a partial screenshot on Mac?
Press Shift + Command + 4, then drag your cursor to capture a specific portion of the screen. This is the quickest way to take a selective Mac screenshot.
Where do screenshots go on Mac?
By default, screenshots on Mac save to the desktop, but you can change the location using the screenshot toolbar (Shift + Command + 5).
You can pay with:
*PayPal Credit Representative Example: Assumed credit limit £1,200, Representative 23.9% APR (variable). Purchase rate 23.9% p.a (variable).Terms & Conditions apply.

PayPal Credit and PayPal Pay in 3 are trading names of PayPal UK Ltd, 5 Fleet Place, London, United Kingdom, EC4M 7RD. Terms and conditions apply. Credit subject to status, UK residents only, Five Tech LTD acts as a broker and offers finance from a restricted range of finance providers. PayPal Pay in 3 is not regulated by the Financial Conduct Authority. Pay in 3 eligibility is subject to status and approval. 18+. UK residents only. Pay in 3 is a form of credit. Check if affordable and how you will repay. May make other borrowing more difficult or expensive. See product terms for more details.
Copyright © 1996-2026 Fivetech LTD | Terms and Conditions
box.co.uk & Box are trading names of Five Tech Limited. Registered office: Box LTD, Unit 10 Woodford Trading Estate, Woodford Green IG8 8HF