
Menu


Get Sales Advice from Mon - Fri 9am - 5:00pm:
020 3337 8950LAST UPDATED: July 06, 2026
How to Apply Thermal Paste: Beginner’s Step-by-Step Guide
Thermal paste application sounds more intimidating than it really is. For most PC builds, it comes down to three things: clean the surface, use the right amount of paste, and mount the cooler evenly.
Thermal paste, also called thermal compound, thermal grease, thermal cooling paste, or heat transfer paste for CPU cooling, sits between your processor and CPU cooler. Its job is to fill tiny air gaps between the CPU integrated heat spreader and the heatsink cold plate.
Without proper thermal paste application, your CPU cooler cannot move heat away as efficiently. That can lead to higher temperatures, louder fans, lower boost clocks, and thermal throttling during gaming or heavy workloads.
This guide explains how to apply thermal paste to a CPU, how much thermal paste to apply, what to avoid, and how thermal paste application changes slightly for AMD AM5 processors, laptops and GPUs.
Quick answer: The best way to apply thermal paste for most CPUs is the pea method or dot method. Place a small pea-sized amount in the centre of the CPU IHS, install the cooler with even mounting pressure, then check CPU temperatures after booting.
What Is Thermal Paste and Why Is It Important?
Thermal paste is a thermal interface material, often shortened to TIM. It helps transfer heat from the CPU to the cooler.
A CPU and cooler may look flat, but their surfaces have tiny imperfections. These microscopic gaps trap air, and air is poor at transferring heat.
Thermal paste fills those gaps.
What Thermal Paste Does
| Part | Role |
|---|---|
| CPU IHS | Metal lid on top of the processor |
| Thermal paste | Fills tiny air gaps |
| Heatsink cold plate | Makes contact with the CPU |
| CPU cooler | Moves heat away from the processor |
| Fans or radiator | Push heat out into the case or room |
Good thermal paste application improves contact between the CPU and cooler. That helps with:
- Lower CPU temperatures
- Better boost performance
- Quieter fan speeds
- Thermal throttling prevention
- More stable gaming performance
- Longer component health
Thermal paste does not magically fix a weak cooler or poor airflow, but it is a key part of the cooling chain.
When Should You Apply or Replace Thermal Paste?
You do not need to replace thermal paste constantly. A well-applied compound can last for years, depending on the paste, temperatures, and system use.
You should apply or replace thermal paste when the cooler has been removed, when building a new PC, or when temperatures are rising without another clear reason.
Common Times to Replace Thermal Paste
| Situation | Should You Apply New Paste? |
|---|---|
| New PC build | Yes |
| Installing a new CPU cooler | Yes |
| Removing and reseating the cooler | Yes |
| Upgrading your processor | Yes |
| Cleaning dust only | Not always |
| CPU temperatures suddenly increase | Check paste and cooler mount |
| Buying a second-hand PC | Worth checking |
| Repasting a laptop | Only if confident or experienced |
If you are building your first system, the Box guide to building your first gaming PC is a useful place to understand where thermal paste application fits into the wider build.
Signs Your Thermal Paste Needs Replacing
Watch for:
- Higher CPU temperatures than usual
- Fans ramping up more often
- Sudden thermal throttling
- Random shutdowns under load
- Lower gaming performance
- Stuttering during CPU-heavy games
- Poor temperatures after a cooler reseat
Before blaming the paste, also check dust, fan curves, cooler mounting screws, and case airflow.
Tools and Materials You Need
You do not need a workshop to apply cooling paste correctly. You just need a clean surface, the right materials and a bit of patience.
Checklist Before Starting
| Tool or Material | Why You Need It |
|---|---|
| Thermal paste | Creates the thermal interface |
| CPU cooler or heatsink | Transfers heat away from the CPU |
| Isopropyl alcohol | Cleans old paste from the surface |
| Lint-free cloth or coffee filter | Removes paste without leaving fibres |
| Screwdriver | Helps install or remove cooler brackets |
| Paper towel | Useful for surrounding cleanup, not final wiping |
| Anti-static care | Helps protect components |
| Good lighting | Makes cleanup and paste placement easier |
You can shop thermal paste for CPU & GPU if you are replacing old compound or building a new system.
If you are also upgrading your cooler, it is worth checking the wider range of CPU coolers and cooling solutions before starting the job.
Safety Tips Before You Begin
Before thermal paste application:
- Shut the PC down fully
- Switch off the PSU
- Unplug the power cable
- Let the system cool down
- Work on a stable surface
- Avoid carpet if possible
- Ground yourself before touching components
- Do not force the cooler if it feels stuck
If you are cleaning old paste, use isopropyl alcohol carefully. Do not flood the motherboard or socket area.
How Much Thermal Paste Should You Apply?
The most common beginner mistake is using too much paste.
You only need enough to fill the microscopic gaps between the CPU integrated heat spreader and cooler plate. More paste does not mean better cooling.
Too much paste can spill over the sides, create mess, and make cleanup harder. Too little paste can leave air gaps and reduce heat transfer.
Simple Amount Guide
| CPU Type | Recommended Amount |
|---|---|
| Mainstream Intel CPU | Small pea-sized dot |
| AMD Ryzen AM4 | Small pea-sized dot |
| AMD Ryzen AM5 | Slightly careful central dot or small multi-dot pattern |
| Larger desktop CPU | Larger dot or line method, depending on shape |
| Laptop CPU die | Thin spread, because the die is exposed |
| GPU die | Thin even coverage, usually spread method |
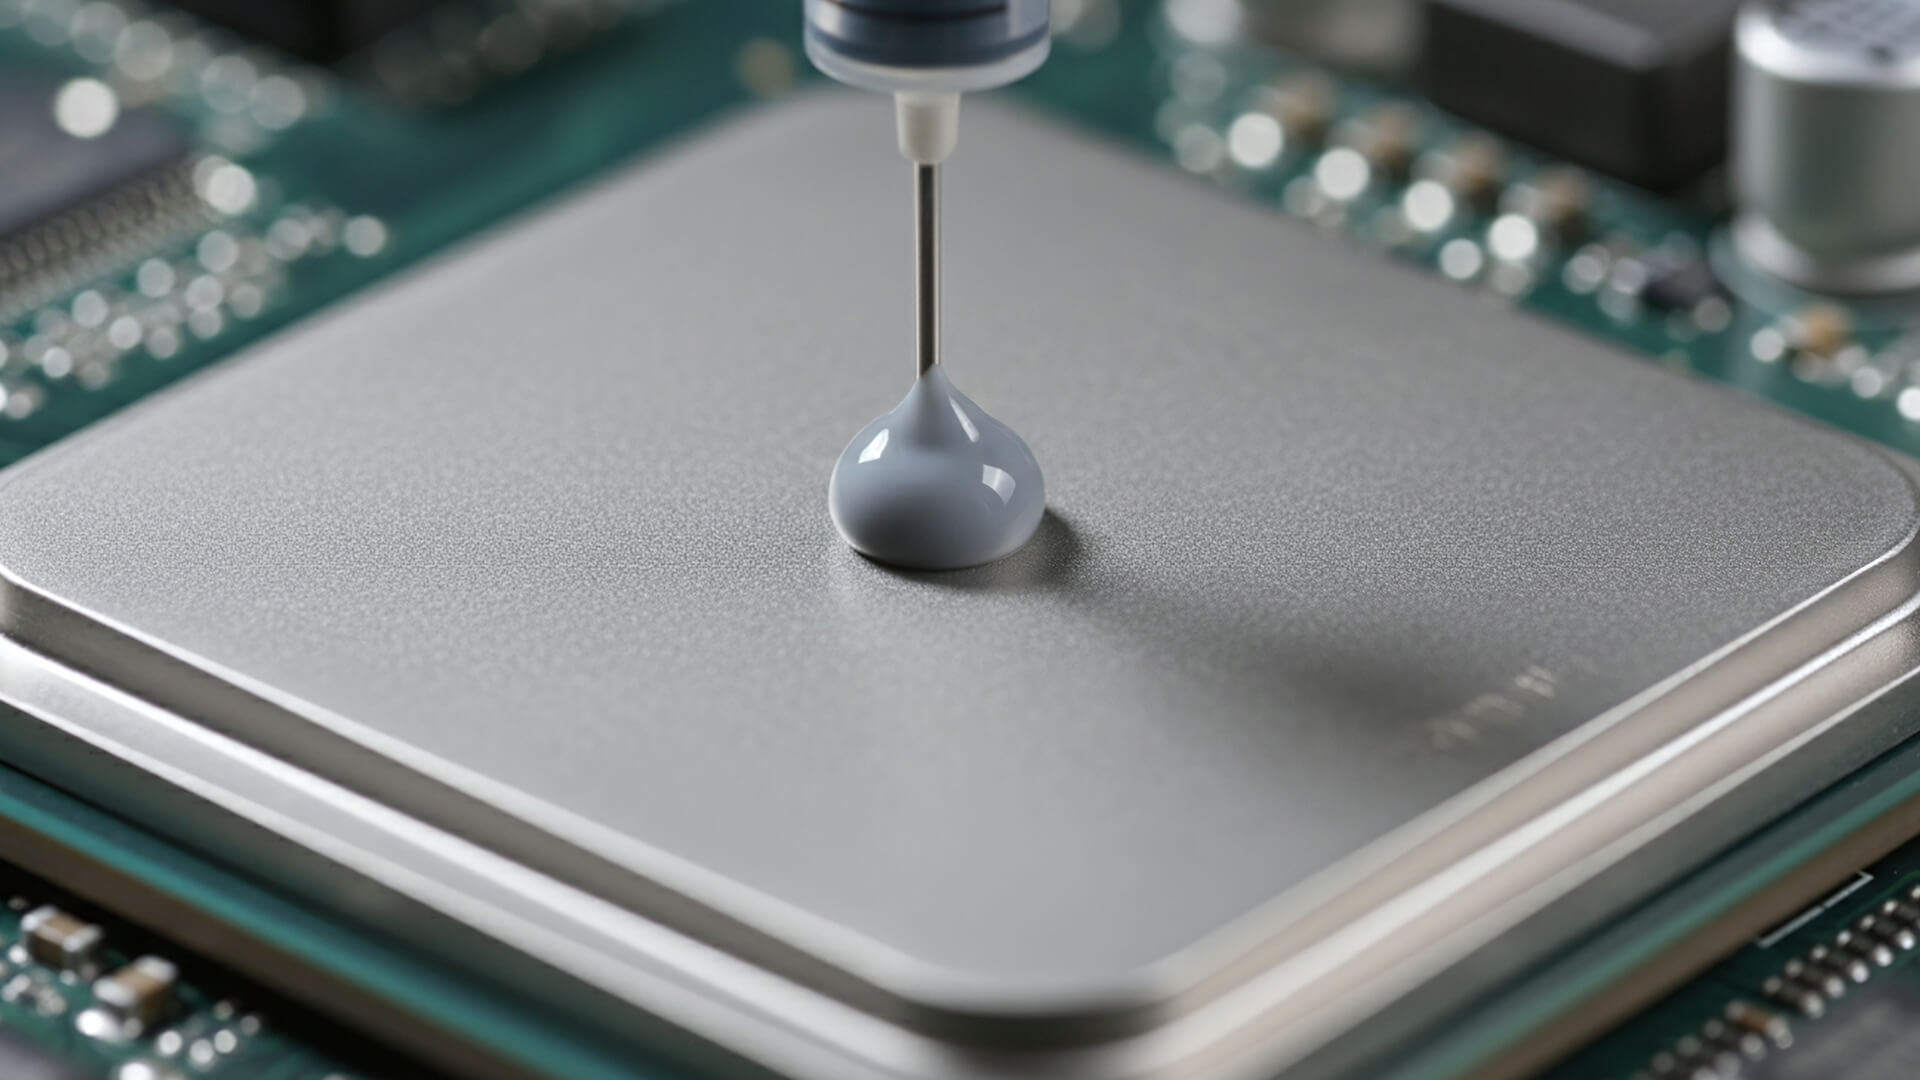
For most desktop processors, a pea-sized dot is enough.
What “Pea-Sized” Means
Think small, not messy.
A good amount is roughly:
- About 4mm to 5mm wide
- Placed in the centre of the CPU
- Not spread to the edges before mounting
- Enough to spread under cooler mounting pressure
The aim is good thermal paste coverage without creating a thick layer. A thinner bond-line thickness usually helps heat transfer, provided the CPU and cooler make proper contact.
How to Apply Thermal Paste to a CPU: Step-by-Step
This is the main process for applying thermal compound to CPU hardware in a desktop PC.
Step 1: Shut Down and Disconnect Power
Turn the PC off completely.
Then:
- Switch off the power supply
- Remove the power cable
- Press the power button once to discharge leftover power
- Place the PC on a stable surface
- Remove the side panel
Let the system cool if it was recently running.
Step 2: Remove the Existing Cooler
If a cooler is already installed, loosen the mounting screws gradually.
Use a cross pattern:
- Loosen the top-left screw slightly
- Loosen the bottom-right screw slightly
- Loosen the top-right screw slightly
- Loosen the bottom-left screw slightly
- Repeat until free
If the cooler feels stuck, do not yank it upwards. Gently twist it side to side to break the old paste seal.
Step 3: Clean Off Old Thermal Paste
Clean both surfaces:
- CPU IHS
- Heatsink cold plate
Use isopropyl alcohol and a lint-free cloth or coffee filter.
Avoid tissues for final cleaning because they can leave fibres behind.
The surface should look clean, dry, and free from old paste before new thermal paste application.
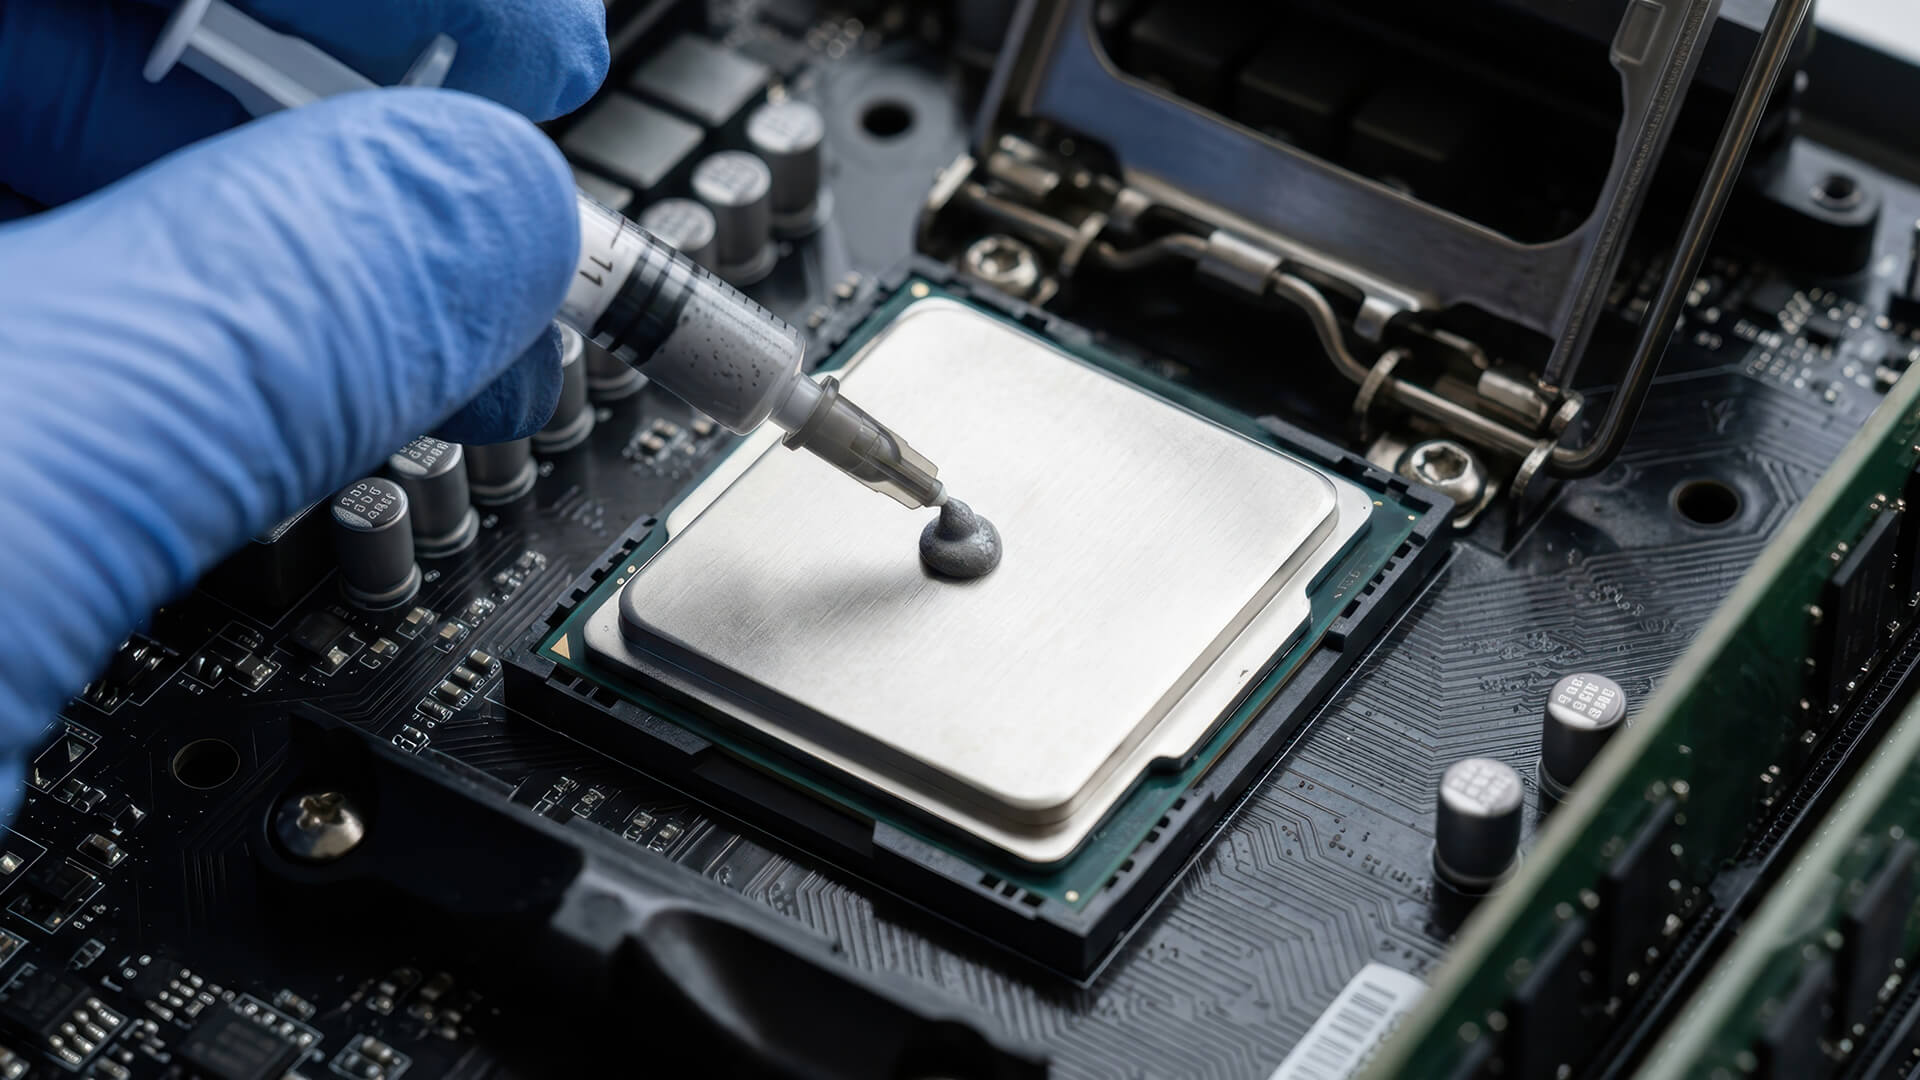
Step 4: Apply New Thermal Paste
For most desktop CPUs, use the dot method.
Place a small pea-sized amount in the centre of the CPU.
Do not touch the paste with your finger. Skin oils and uneven spreading can make the result worse.
Step 5: Install the CPU Cooler
Line up the cooler carefully.
Lower it straight down onto the CPU. Try not to slide it around too much once it touches the paste.
Sliding can create uneven coverage or air pockets.
If you need a new cooler, make sure you browse compatible CPU coolers based on your CPU socket, case clearance, and workload.
Step 6: Tighten Cooler Mounting Screws Correctly
Tighten screws in a cross pattern.
Do not fully tighten one screw before the others. This can create uneven CPU cooler mounting pressure.
Use this pattern:
| Order | Position |
|---|---|
| 1 | Top-left |
| 2 | Bottom-right |
| 3 | Top-right |
| 4 | Bottom-left |
Repeat gradually until the cooler is secure.
Step 7: Check Mounting Pressure
Proper mounting pressure helps spread the paste evenly.
Check that:
- The cooler is not tilted
- Screws are evenly tightened
- The cooler bracket is secure
- The fan cable is connected
- Nothing is blocking the fan
- The cooler is not pressing against RAM or case panels
Do not overtighten past the cooler’s intended stop point.
Step 8: Power On and Monitor Temperatures
After thermal paste application, boot into BIOS or Windows and check CPU temperatures.
Use CPU temperature monitoring software to check:
- Idle temperature
- Gaming temperature
- Full load temperature
- Fan behaviour
- Any throttling warnings
If temperatures are unusually high, shut down and check cooler mounting first. Bad mounting causes more problems than the paste pattern itself.
What Is the Best Thermal Paste Application Method?
There is no single perfect method for every CPU, but some methods are easier and safer for beginners.
Thermal Paste Methods Compared
| Method | Best For | Difficulty | Notes |
|---|---|---|---|
| Pea/Dot method | Most desktop CPUs | Easy | Best for beginners |
| Line method | Longer CPU heat spreaders | Easy | Works well on some chip shapes |
| X-pattern | Larger CPUs | Medium | Can use too much paste if careless |
| Spread method | Laptop CPU/GPU dies | Medium | Needs careful thin coverage |
The Pea Method
The pea method (also known as the dot method) is the best way to apply thermal paste for most beginners.
Why it works:
- Simple
- Clean
- Low risk
- Mounting pressure spreads paste naturally
- Good for most mainstream CPUs
Use this method for most gaming PC builds.
The Line Method
The line method places a thin line of paste across the CPU.
It can work well on longer heat spreaders, but beginners often make the line too thick.
Use a thin line, not a stripe of toothpaste.
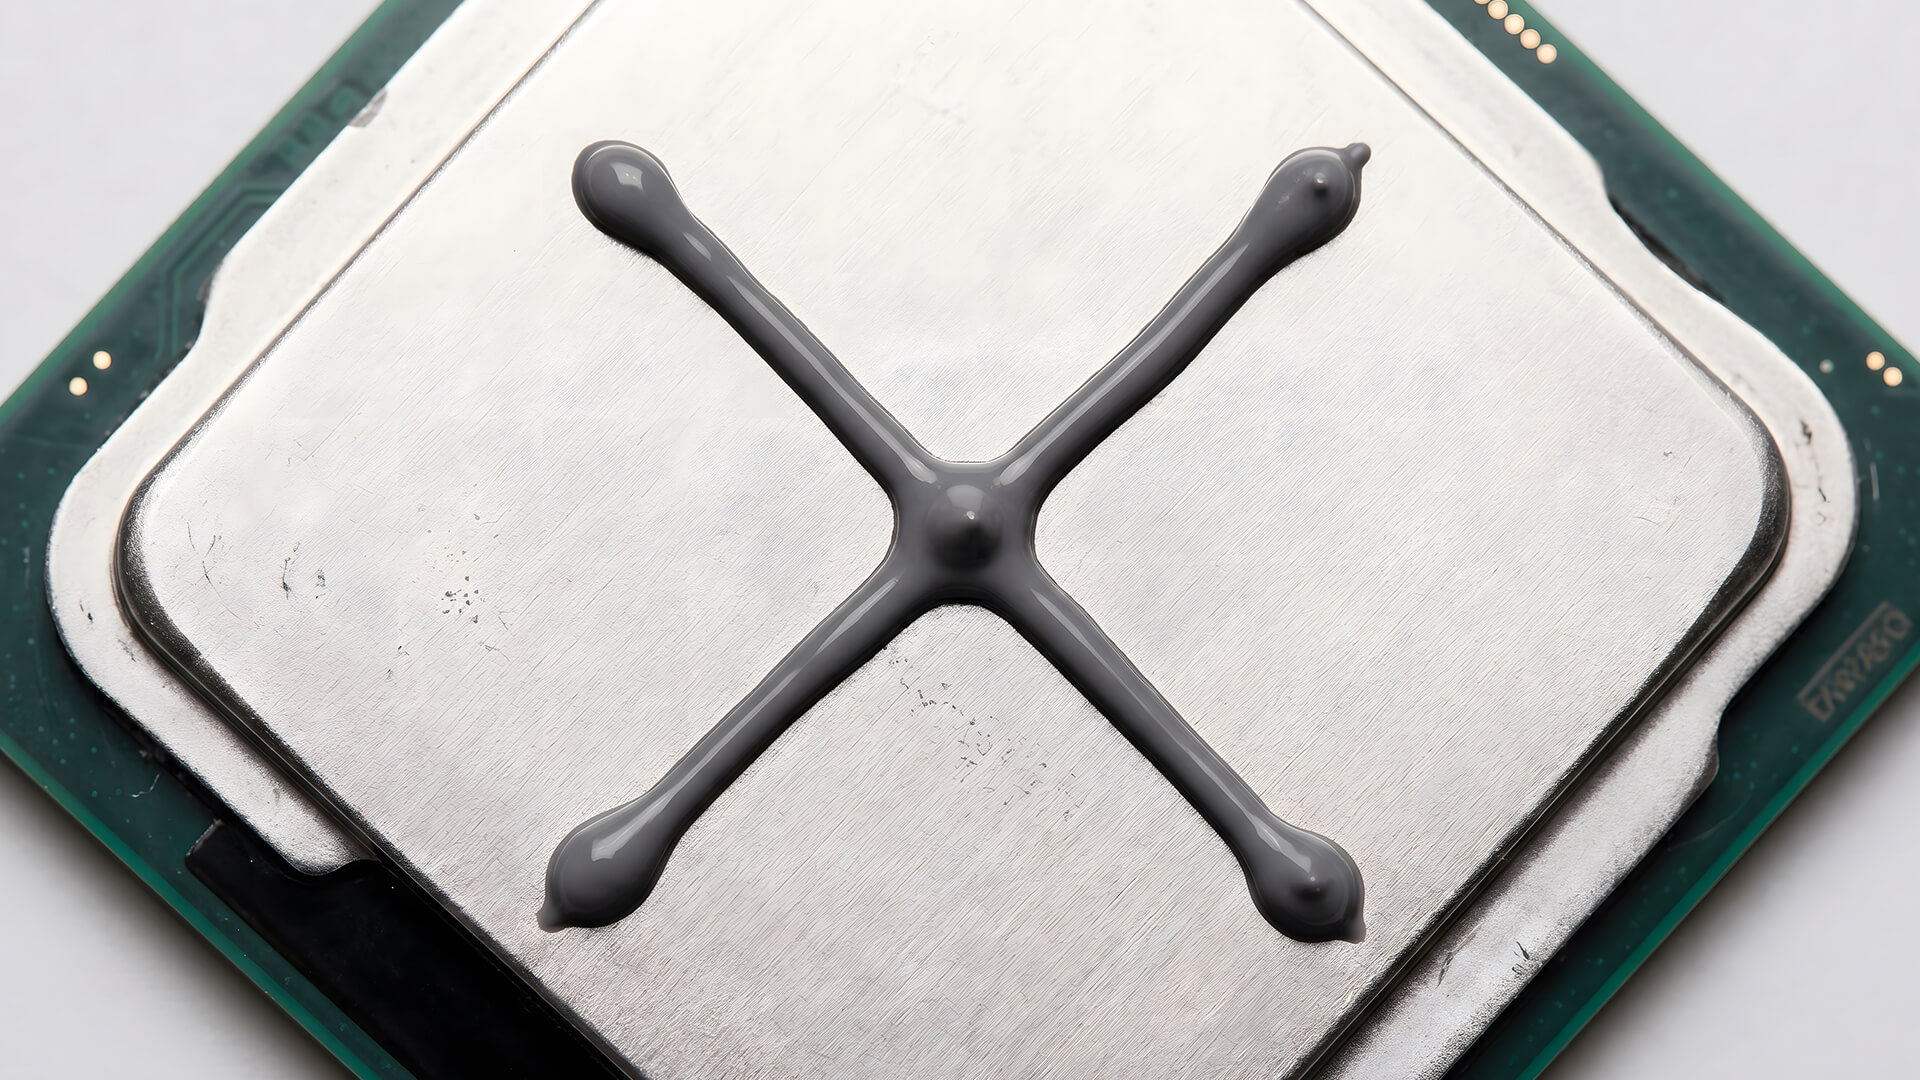
The X-Pattern Method
The X-pattern method places two thin diagonal lines across the CPU, forming an X shape.
It can work well on larger processors because it helps spread thermal paste towards more areas of the CPU IHS once the cooler is tightened. This can be useful for bigger heat spreaders where one small central dot may not always reach the edges as evenly.
However, beginners need to be careful with this method. The X-pattern can easily use too much paste if the lines are thick. You only need thin lines, not heavy streaks across the whole processor.
Use the X-pattern if:
- You are working with a larger CPU heat spreader
- You want wider initial coverage
- You are confident you can apply thin lines
- Your cooler mounting pressure is even
Avoid it if you are unsure about the paste amount. For most mainstream gaming PC builds, the pea method is still the simpler and safer choice.
The Spread Method
The spread method means manually spreading paste over the CPU surface.
It is useful for exposed dies, laptop CPUs, and GPUs, but it is less necessary for standard desktop CPUs.
If you spread paste, aim for:
- Thin layer
- Even coverage
- No air bubbles
- No thick clumps
- No bare patches
Which Method Works Best for Most Users?
For most people, use the pea method.
It is simple, reliable, and avoids overthinking thermal paste application. The cooler’s mounting pressure will do most of the spreading for you.
How to Apply Thermal Paste on AMD AM5 Processors
AMD AM5 processors have a distinctive IHS shape with cut-outs around the edge. That shape can make paste cleanup slightly more awkward if too much paste spills out.
The process is still simple.
AM5 Thermal Paste Tips
| Tip | Why It Helps |
|---|---|
| Use a modest central dot | Reduces spillover into IHS cut-outs |
| Avoid excessive X-patterns | Can push paste towards the edges |
| Clean carefully around the IHS | Paste can collect in notches |
| Use non-conductive paste | Safer for beginners |
| Mount the cooler evenly | Helps proper coverage |
For AM5, the best approach is usually a small central dot or carefully controlled multi-dot pattern. Do not overapply, as excess paste can spread into the cut-out areas around the CPU IHS and make cleanup more awkward.
If you are applying paste as part of a new AMD build, it is worth checking that your cooler is properly matched to the socket and processor before installation. You can also shop AMD Ryzen CPUs at Box if you are planning a fresh AM5-based system.
How to Apply Thermal Paste to a Laptop CPU
Laptop thermal paste application is more delicate than desktop CPU work.
Laptop CPUs often use an exposed die rather than a large desktop-style heat spreader. That means the cooler contacts the chip surface directly.
You should only repaste a laptop if you are comfortable opening it. It may affect warranty depending on the device.
Laptop Repaste Checklist
| Step | What to Do |
|---|---|
| 1 | Shut down and unplug the laptop |
| 2 | Remove the bottom panel carefully |
| 3 | Disconnect the battery if possible |
| 4 | Remove the heatsink screws in order |
| 5 | Clean old paste from the CPU and cooler |
| 6 | Apply a thin even layer |
| 7 | Reinstall the heatsink evenly |
| 8 | Reconnect everything and test temperatures |
For laptops, the spread method is usually better than a pea-sized dot because the die is smaller and exposed.
Use less paste than you think you need. The aim is thin coverage, not a blob.
How to Apply Thermal Paste to a GPU
GPU repasting is more advanced than CPU repasting. It can help if your graphics card is overheating, but it also involves more risk.
A GPU cooler may include:
- GPU die
- VRAM thermal pads
- VRM thermal pads
- Small screws
- Fan connectors
- Backplate screws
Do not repaste a GPU unless you are comfortable disassembling the card.
GPU Thermal Paste Tips
| Do | Avoid |
|---|---|
| Use non-conductive paste | Liquid metal unless experienced |
| Photograph screw locations | Mixing screw lengths |
| Keep thermal pads in place | Tearing or misplacing pads |
| Spread paste evenly on the die | Leaving bare die areas |
| Check fan cables before closing | Pulling cables forcefully |
For GPU dies, use a thin spread method. The die should be covered evenly because there is no desktop-style heat spreader to help distribute paste.
Common Thermal Paste Mistakes to Avoid
Most thermal paste problems come from simple mistakes.
Mistake Checklist
| Mistake | Why It Causes Problems |
|---|---|
| Using too much paste | Messy spillover and thick layer |
| Using too little paste | Air gaps and poor heat transfer |
| Reusing old paste | Dry, uneven contact |
| Touching paste with fingers | Oils and contamination |
| Not cleaning old paste | Uneven thermal interface |
| Uneven cooler mounting | Poor pressure and bad coverage |
| Forgetting fan cables | Cooler may not work properly |
| Using conductive paste carelessly | Can risk shorts if spilled |
| Overtightening screws | Can damage mounting hardware |
| Removing cooler after mounting | Paste seal breaks and should be redone |
If you remove the cooler after installation, clean the paste and reapply it. Do not simply press it back down and hope for the best.
Checking Your Results After Installation
After applying thermal paste, check whether the system behaves normally.
What to Check
| Check | Good Sign |
|---|---|
| BIOS temperature | Not climbing rapidly |
| Idle temperature | Stable and reasonable |
| Gaming temperature | Within safe range for the CPU |
| Fan noise | Not instantly maxing out |
| Clock speeds | Not dropping heavily under load |
| System stability | No crashes or shutdowns |
Temperatures vary by CPU, cooler, case, room temperature, and workload. Do not panic if your CPU runs warmer than someone else’s online. Compare against your previous temperatures and the CPU’s expected behaviour.
If temperatures are too high:
- Check the cooler is mounted correctly
- Check the fan or pump is connected
- Check the protective plastic was removed from the cooler
- Check paste amount
- Check airflow inside the case
- Reseat the cooler if needed
The “forgotten plastic film” mistake is more common than people admit.
Choosing the Right Thermal Paste for Your Build
Most beginners should choose a good non-conductive paste. It is safer, easy to apply, and suitable for CPUs and GPUs.
Types of Thermal Paste
| Type | Best For | Notes |
|---|---|---|
| Ceramic compound | General use | Often safe and non-conductive |
| Carbon-based paste | Performance and longevity | Popular for gaming PCs |
| Metal-based compound | Advanced users | Can be conductive |
| Liquid metal | Specialist cooling | Risky if used incorrectly |
Features to Look For
| Feature | Why It Matters |
|---|---|
| Thermal conductivity | Often shown as W/mK |
| Ease of application | Helps beginners avoid mess |
| Longevity | Reduces how often you repaste |
| Non-conductive formula | Safer around components |
| Curing time | Some compounds settle after use |
| Consistency | Easier spreading and mounting |
Thermal conductivity numbers can be useful, but they are not everything. A paste that is easy to apply well can outperform a “better” paste applied badly.
For most builds, avoid electrically conductive compound unless you know exactly what you are doing.
Improving Overall PC Cooling Beyond Thermal Paste
Thermal paste application is only one part of CPU cooling performance. If the rest of the system runs hot, new paste alone will not solve everything.
Cooler Upgrades
A stronger CPU cooler can make a bigger difference than changing paste brands.
Consider:
- Tower air coolers for strong value
- Low-profile coolers for compact builds
- Larger heatsinks for quieter cooling
- Better fans for airflow and noise control
If you are upgrading, browse compatible CPU coolers that fit your socket and case.
AIO Liquid Coolers
AIO liquid coolers can help with high-performance CPUs, overclocking, and cleaner builds.
They are useful when:
- Your CPU runs hot under load
- Your case supports radiator mounting
- You want lower CPU temperatures
- You prefer a tidy build look
- You are using a higher-end gaming processor
You can explore our AIO cooler lineup if your build needs stronger cooling.
Case Airflow
Good airflow helps every component, not just the CPU.
Focus on:
- Cool air intake at the front or bottom
- Warm air exhaust at the rear or top
- Clean fan filters
- Clear cable routing
- Enough space around the GPU
- Balanced intake and exhaust
If your case airflow is poor, thermal paste application will only help so much. For better airflow, look at PC case airflow upgrades.
If you are planning a wider gaming build, our guide to the best gaming processors for every budget can help match CPU choice with the right cooling level.
Wrapping Up
Thermal paste application does not need to be perfect to work well. It just needs to be clean, sensible, and paired with proper cooler mounting pressure.
For most desktop CPUs, the best way to apply thermal paste is simple:
- Clean the CPU and cooler
- Add a pea-sized dot in the centre
- Mount the cooler evenly
- Tighten screws gradually
- Check temperatures after booting
Do not overthink it. Too much paste, poor mounting, and forgotten cooler cables cause more problems than choosing between a dot or line pattern.
If you are starting a new build or refreshing an older one, focus on the whole cooling setup. Good thermal paste, a reliable cooler, sensible airflow, and clean fans all work together to keep your CPU running smoothly. If you are replacing the CPU as part of a larger upgrade, browse the right processors for your build before choosing a cooler and thermal paste. For more help before upgrading, our guide to choosing the right CPU for your needs explains what to look for before buying.
Frequently Asked Questions
-
How long should I wait after applying thermal paste?
You do not usually need to wait. Most modern thermal pastes work immediately after the cooler is installed. Some compounds may have a short curing or settling period, but you can normally use the PC straight away.
-
How long after applying thermal paste can I turn on my PC?
You can turn on your PC as soon as the cooler is installed, the fan or pump is connected, and everything is mounted correctly. Always check CPU temperatures after booting.
-
How often should thermal paste be replaced?
For most desktop PCs, every 2 to 4 years is reasonable. Replace it sooner if temperatures rise, the cooler has been removed, or the paste has dried out. Heavy gaming PCs and hot-running systems may need repasting sooner.
-
Can too much thermal paste damage my CPU or motherboard?
Too much non-conductive thermal paste usually causes mess rather than damage. However, it can spill around the socket and make cleanup difficult. Conductive compounds or liquid metal can cause damage if they spread onto components, so beginners should avoid them.
-
Do all CPU coolers come with pre-applied thermal paste?
Many CPU coolers come with pre-applied thermal paste, but not all of them do. Always check the cooler before installing it. If paste is already applied, you usually do not need to add more.
-
Is thermal paste necessary for every CPU installation?
Yes. A CPU should always have thermal paste or a pre-applied thermal interface material between the CPU IHS and the cooler. Running a CPU cooler without paste can cause poor heat transfer and very high temperatures.
-
Can I use the same thermal paste on a CPU and GPU?
Yes, most non-conductive thermal paste can be used on both CPUs and GPUs. GPU repasting is more advanced, though, because you may also need to handle thermal pads, small screws, and fan connectors.
-
What is the best way to apply thermal paste?
For most desktop CPUs, the best way to apply thermal paste is the pea method. Place a small dot in the centre of the CPU and let the cooler’s mounting pressure spread it.
-
How much thermal paste should I apply on a CPU?
Use a small pea-sized dot for most mainstream desktop CPUs. Larger CPUs may need a slightly larger dot, line, or controlled pattern, while laptop and GPU dies usually need a thin spread.
You can pay with:
*PayPal Credit Representative Example: Assumed credit limit £1,200, Representative 23.9% APR (variable). Purchase rate 23.9% p.a (variable).Terms & Conditions apply.

PayPal Credit and PayPal Pay in 3 are trading names of PayPal UK Ltd, 5 Fleet Place, London, United Kingdom, EC4M 7RD. Terms and conditions apply. Credit subject to status, UK residents only, Five Tech LTD acts as a broker and offers finance from a restricted range of finance providers. PayPal Pay in 3 is not regulated by the Financial Conduct Authority. Pay in 3 eligibility is subject to status and approval. 18+. UK residents only. Pay in 3 is a form of credit. Check if affordable and how you will repay. May make other borrowing more difficult or expensive. See product terms for more details.
Copyright © 1996-2026 Fivetech LTD | Terms and Conditions
box.co.uk & Box are trading names of Five Tech Limited. Registered office: Box LTD, Unit 10 Woodford Trading Estate, Woodford Green IG8 8HF